Saturday, July 23, 2022

Using Redirects For Easy Profile Linking

301 Redirect

If you're anything like me, you probably have a plethora of user profiles all over the web. Most of these have some rather ugly URLs which makes sharing and linking to these profiles kind of cumbersome. For example, my user profile on Garmin Connect is https://connect.garmin.com/modern/profile/d04d79c2-2124-431d-b186-96e3ce48a7ba. If you're talking with a friend or at an event, you're probably not going to tell somebody to follow you and spell out a nasty URL like that. It's much easier to just tell them something like garmin.gregkjono.com and have that automatically forward them to that long cryptic URL.

This is done using HTTP redirects, or a forwarding service. HTTP redirects have been around for decades. In years past, you could use a web server to redirect users from one URL to another. Now, Google Domains allows you to easily setup redirects like this using their forwarding service. 

Web Forwarding

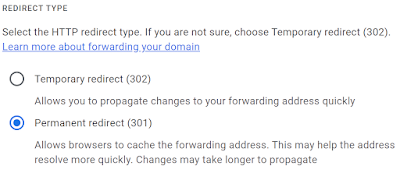
If you go into the advanced options you have some more options as well. You can choose whether it's a permanent redirect, or temporary.
Temporary or Permanent Forwarding

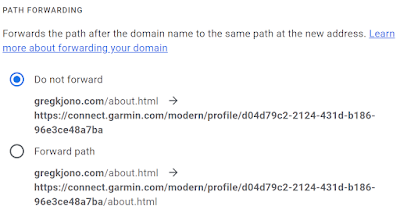
Path forwarding is another advanced option. If you choose "Do not forward" here, any file path with be redirected to the exact URL that you set to forward to. If you do forward paths, /file on one domain would redirect to /file on the domain that you forward to. Personally, I almost always choose to not forward paths.
Path Forwarding

The final advanced option is whether to forward SSL (HTTPS) requests as well. I enabled this every time, otherwise if somebody tries to use HTTPS, it would just fail.

SSL forwarding

None of these services have any additional fees, as long as you are using Google Domains as your domain registrar.

So, being I have gregkjono.com registered with Google domains, I was able to setup a lengthy list of redirects, like these

You can also go to a another level with these. For example, I have multiple Instagram accounts. What I did was redirect instagram.gregkjono.com to my main personal Instagram account. Then I added subdomains below instagram.gregkjono.com for my more focused Instagram accounts. So, now I have a list like this.
So, all-in-all, this is a simple trick to simplify your online presence. If you'd like more details on setting these up, Google has a walk-through in their help pages.

Monday, July 18, 2022

SolarWinds KB


I've been doing work on SolarWinds products for close to a decade now, including several years as a SolarWinds consultant. 

I'm kicking off a new blog dedicated exclusively to SolarWinds at https://solarwinds.gregkjono.com where I will be sharing various scripts, queries, tips and tricks that you can use to fix, enhance, automate and integrate your SolarWinds environment. There's an RSS feed available at http://solarwinds.gregkjono.com/feeds/posts/default which you can follow to get notified of new posts as well.

In relation, I am also starting to dump various scripts and queries to a GitHub repo. Feel free to follow me on GitHub if you'd like to keep an eye on it.

Wednesday, January 18, 2017

Alternate Resolution: The public folder database contains folder replicas


I had a rather complex Exchange environment. I started with an Exchange 2010 server which I configured in a hybrid exchange configuration with Office 365, then later added an Exchange 2016 server on premise. I wanted to remove the Exchange 2010 server leaving just the Exchange 2016 server and Office 365 in a hybrid environment. However, I kept getting the error below when I was trying to remove the Exchange 2010 Public Folder database.

The public folder database ‘Public Folder Database’ cannot be deleted.
Public Folder Database
Failed
Error:
The public folder database “Public Folder Database” contains folder replicas. Before deleting the public folder database, remove the folders or move the replicas to another public folder database. For detailed instructions about how to remove a public folder database, see http://go.microsoft.com/fwlink/?linkid=81409&clcid=0x409.
I had already removed all of the public folders, but the error was persistent. However, my Google foo pulled up this resolution buried in a comment on the 300th page I looked at. This worked for me, hopefully it can help you too.

Set-OrganizationConfig -PublicFolderMigrationComplete $True

Remove-PublicFolderDatabase "Public Folder Database" -RemoveLastAllowed

****Use at your own risk****

Thursday, January 5, 2017

RESOLVED - We couldn't install updates because there's a problem with the date and time information on your device

I ran into a very misleading error on my Windows 10 and Windows 2016 systems the other day. When trying to run Windows Update it returned a message saying something like "We couldn't install updates because there's a problem with the date and time information on your device". I checked the event logs and saw a few other errors that hinted at it being a date/time related issue as well.

Log Name:      Microsoft-Windows-WindowsUpdateClient/Operational
Source:        Microsoft-Windows-WindowsUpdateClient
Date:          1/4/2017 1:45:54 PM
Event ID:      25
Task Category: Windows Update Agent
Level:         Error
Keywords:      Failure,Check for Updates
User:          SYSTEM
Computer:      UpdateClientSystem
Description:
Windows Update failed to check for updates with error 0x800B0101.
There was another variation of this error with a different error code as well.

Windows Update failed to check for updates with error 0x80248014.

Of course I Googled the crap out of these errors, and everything pointed to the time being off on by system. I checked the date and time on both the system I was trying to update, and the WSUS server and they both looked correct. I ran "w32tm /resync" on both of them to resync the time with our NTP servers, but that didn't change anything either. I applied any missing patches on my WSUS server, including a few that were supposedly related to patching Windows 10/Windows2016, and it still failed.

Looking at the WindowsUpdate.log file, there was finally a hint at the truth.

2017/01/04 12:27:37.6720022 1136  388   WebServices     Auto proxy settings for this web service call.
2017/01/04 12:27:37.7919013 1136  388   WebServices     WS error: There was an error communicating with the endpoint at 'https://WSUS-SERVER.DDOMAIN.LOCAL:8531/ClientWebService/client.asmx'.
2017/01/04 12:27:37.7919026 1136  388   WebServices     WS error: There was an error sending the HTTP request.
2017/01/04 12:27:37.7919045 1136  388   WebServices     WS error: A required certificate is not within its validity period when verifying against the current system clock or the timestamp in the signed file.
2017/01/04 12:27:37.7921406 1136  388   WebServices     WS error: The date in the certificate is invalid or has expired
2017/01/04 12:27:37.7921478 1136  388   WebServices     Web service call failed with hr = 800b0101.
That's right, the certificate was expired on my WSUS server. It had nothing to do the date or time on my Windows Update client, or the WSUS server. I renewed the certificate that was configured in the IIS bindings on my WSUS server and everything was happy again!

Wednesday, September 28, 2016

Microsoft released a series of patches that broke user group policies - Resolution

Microsoft released a series of patches that broke user group policies. Below is a snippet from the TechNet blog at https://blogs.technet.microsoft.com/askpfeplat/2016/07/05/who-broke-my-user-gpos/.

We released new security patches for all currently supported Operating Systems. Among those patches was this one: MS 16-072, which is also referenced as KB 3163622. OS Specific articles are released as 3159398, 3163017, 3163018, and 3163016.

KB 3159398 – Vista, 2008, 7, 2008 R2, 2012, 8.1, 2012 R2
KB 3163017 – Windows 10 TH1
KB 3163018 – Windows 10 TH2 and Server 2016 TP4
KB 3163016 – Server 2016 TP5

NOTE: The AskDS blog also has some excellent content out there on this topic that can be found here.
After applying the appropriate patch to your systems, User group policies are retrieved from SYSVOL differently than before. Prior to the update, domain joined computers used the user’s security context to make the connection and retrieve the policies. After the update is applied, domain joined computers will now retrieve all policies using the computer security context. The users that get the policy is still controlled by the policy scope just like before. The only change is the computer is getting the policy for the user.

Ones that still had the default security scope of “authenticated users” typically still worked because that also grants the permission to any domain authenticated computers.

To work around this change, the computer account will need “read” access to all GPOs in order to evaluate whether the user policies are applicable. I used group policy to grant the “domain computers” group read access to all existing group policies, and modified the security descriptor in the defaultSecurityDescriptor property of the CN=Group-Policy-Container object in the AD schema so that new policies will get this permission by default. I have tested this and it seems to have fixed the issue in new and existing group policies. I originally thought this may be directly related to Windows 10 being that’s where I was seeing it, but I guess not. If you have had issues with user group policies lately, this was probably the problem.


Below is exactly what I did to fix the issue.

From an elevated PowerShell prompt I ran:
Set-GPPermissions -all -PermissionLevel GpoRead -TargetName “Domain Computers” -TargetType Group

That grants the "domain computers" group read permissions to all of the existing group policies. This will not remove any other permissions that were already granted to that group.

Next I logged in to the domain controller that holds the operations master role. From there you can open ADSIedit and connect to the schema naming context. Find the CN=Group-Policy-Container object, right-click and click properties. Locate the defaultSecurityDescriptor attribute, and click edit. Append (A;CI;LCRPLORC;;;DC) to the end of that string. This will grant the "domain computers" group read access to any new group policies that are created in the domain.

Wednesday, June 29, 2016

Delete Exchange Management Console Cache

I recently ran into an issue with the Exchange Management Console (EMC) trying to contact old non-existent domain controllers after a Active Directory domain upgrade. When I tried to access parts of Exchange through the Exchange Management Console, it would prompt a message saying that "Unable to find 'OldDC.domain.local' computer information in domain controller 'OldDC.domain.local' to perform the suitability check. Verify the fully qualified domain name. It was running the command " or "OldDC.domain.local isn't a fully qualified domain name (FQDN). Please provide valid FQDN".

To solve this problem, I just needed to delete the MMC cache for the Exchange Management Console at "C:\Users\%username%\AppData\Roaming\Microsoft\MMC\Exchange Management Console".

Wednesday, November 27, 2013

Quick JPEG Optimization to Speed Up Your Web Site

If you would like to quickly optimize the jpeg images for your web site, here's a quick method that works pretty good.

First, download jpegtran.exe, and save it to C:\

Download your image files to C:\Users\administrator\Desktop\files, or change the path in the code below to point to the root folder where you want to search for images to optimize. The script will crawl through subdirectories, so don't worry about the directory structure under the path that you specify.

Open a PowerShell prompt (you may need to "run as administrator" depending on your security settings). If your files are in a different path, or you placed jpegtran.exe edit the code below to reflect those difference. Run the code below.


$files = Get-ChildItem -Path C:\Users\administrator\Desktop\files -Recurse | where {$_.Extension -eq ".jpg"}
foreach($file in $files){
    [string]$image = $file.FullName
    [string]$cmd = "C:\jpegtran.exe -copy none -optimize $image $image"
    Invoke-Expression $cmd
}

The way the previous code is written, it will overwrite the existing file with the optimized one, so make a copy of them first if you want to keep the original as well.

I hope that helps. I optimized all of the JPEGs on one of my sites in a few minutes, and that includes writing the PowerShell code above.